Your donations make more tutorials possible. Thanks!
Sometimes, you might find that you'd like to blend two materials in Photoshop. You might want to do this to show both a finished render and a wireframe from a 3D Program, or to simulate an object blending from Negative into Positive, or for some other reason.
It's a very simple effect to achieve. Watch the movie to learn one way to do it. ((You can download the movie, if you have trouble watching on line. You can also download an .rtf file with the transcript, if you'd like one.)
It's all done with Masks.
Put the two images in the same document, if they're not there already, by making sure that they are the same size, holding down the Shift key, and dragging one on top of the other.
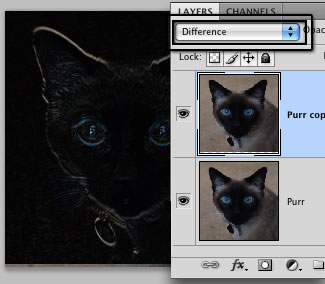
Make sure they match by changing the blend mode of the one on top to Difference. This will make the pixels black, where they are exactly the same, and can make it a snap to tell if things are really lining up.
If you're coming from a 3D Program that made an Alpha Channel when you rendered, you can go to Select > Load Selection. Otherwise, just skip this step.
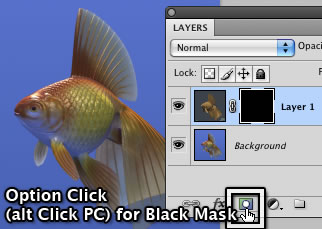
Make a mask by clicking the New Mask icon, at the bottom of the Layers panel. If you had a Selection, everything except that wasn't selected will be hidden. If you didn't, then nothing will, of course. (Unless you hold Option when you click, in which case everything will! See below.)
Then all you need to do, really, is to paint in black on the mask! That will hide the portion of the image that you don't want to show. Paint in white to show it again, if you hid too much.
And that's really all there is to it. Enjoy!
For more information about things shown in the movie, (and some that weren't) see the Accordion below.
 When it's necessary to match two layers in Photoshop, there are lots of different ways to make sure that the match is exact.
The best way I know of is to set the Blending Mode of the top image to Difference. When the pixels in the two images match, they will be solid black.
If they are off by even a little bit, as you can see in the 3 pixel offset in this image of my cat, Purr, the mis-match shows up as an easily seen white rim.
You can just use the Arrow Keys to nudge the image into place. When it turns black, you've got it!
This works well, even if the two images aren't perfect matches, like this one. the parts that do match will turn black, so it's still easy to do!
When you've got it, return to Normal mode (or whatever mode you need) and finish doing whatever it was you wanted to do.
 When you need to hide most of a layer, and only show a little, it might be more convenient to start with a totally black mask (everything hidden) that you can paint a few white strokes into, to show things.
If it is, you can easily make one by holding down the Option key on a Mac (alt key on a PC) while you click the Add Mask (New Mask) button.
The same trick works if you have a selection, and realize that you want to hide what's selected, and show what's not. If you hold down Option/alt when you click to add a mask, it will automatically show what is not selected, insteading of showing what is. That saves you from having to Invert the mask, and might just make your life easier!