Your donations make more tutorials possible. Thanks!
If you need smooth curves, straight lines, or a combination of the two, the Pen Tool is the easiest way to do the job!
The Pen Tool makes paths, or Bézier Curves (pronounced bezz-ee-AYE) which are resolution independent. In other words, the path will remain smooth, even if you change the image size. (Strokes or fills you've made from it are raster1 objects, of course, and will change when the image is resized. But the paths themselves, which are vectors,2 won't.)
Bézier Curves are made of anchor points, with line segments between them.
Watch the movie to find out all about the tool. (You can download the movie, if you have trouble watching it on line.)
In Photoshop, you make a new anchor point by clicking with the pen tool. When you click again, Photoshop adds a new point, and draws the line segment between the two points. If you simply click, your line segments will be straight.
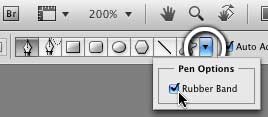
To see the line before you click to make the point, enable "Rubber Band" in the Tool Options (at the top of the window, in Photoshop CSx. Watch the movie to see exactly where.)
If you'd like a curved line segment with a smooth point,3 click and drag. You'll see control handles, and the line before the point will curve. Drag out until the handle is at a tangent to the curve you want for the next segment, and about a third of its length. The next segment will reflect that curve, when you make another point.
To make a corner point,4 click and drag, and while you are drawing the handle hold down Option on a Mac/alt on a PC, and move the handle. It will move independently of the handle that controls the previous part of the curve. (Or you can hold the keys, and click again on the point to change the control handles.)
To make a smooth point with different length handles, simply click on the point after drawing it, and drag out the length you want. If you change the angle, though, it will change the angle of both handles.
To delete a point you've made previously, click on it again with the Pen Tool.
To change the anchor points from smooth to corner, or vice versa, hold down the Option/alt key and click on the point.
To edit the curves by moving the control handles once the curve has been made, use the Direct Selection tool (the white arrow.)
Once you have a path, you can use it to make a selection, fill an area, or stroke the path itself, with or without simulating pressure. To do any of these things, use the buttons at the bottom of the Pen Palette. (Hover over the icons with Tool Tips enabled to see which do what. Select a tool before you click the Stroke button to Stroke the path with that tool. Hold down Option/alt and click on the stroke button to enable (or disable) Simulate Pressure.)
There is additional information in the Accordion below, if you'd like more.

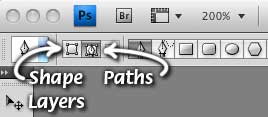
You'll find Pen Tool options at the Options Bar at the top of the Window in all versions of Photoshop CS. After the presets, you'll find a button with 3 modes; they are Shape Layers, Paths, and Fill Pixels, reading from left to right. (Fill Pixels will be dimmed, if you're using the Pen Tool.)
Click the one that will make the kind of output you need.

There is only one Option for the Pen Tool - and that's Rubber Band.
Enable it, if you want to see the line you're making before you click to make the next anchor point. Disable it if you don't.
It can be helpful to have exercises to follow, when you're learning to use the Pen Tool. These will tell you where to click, and where to drag, so you can get the hang of it.
They are .jpg files that will open in a new window when you click the link.
To use them, copy them to your computer, open in Photoshop, and follow the instructions.
Note: if you would like to see the information in the Accordion when printing the page, disable Javascript in your Browser, and reload the page. You should see all the Accordion panels open before you print.
1 Raster objects are grids of pixels. When they are resized, the application has to extrapolate among the color values on the grid to build the new grid at a different size, and images can wind up with "jaggies" or very blurry. Return to Raster in text.
2 Vector objects are mathematical descriptions of curves and lines; so the application doesn't have to extrapolate anything if the image size changes. It simply draws the same curve, at the new size, and it's always as crisp and clear as it can be. Return to Vector in text.
3 Smooth Points have control handles that are connected; when you move one, it moves the other as well, so that the two line segments will always have a smooth curve. Return to Smooth Point in text.
4 Corner Points have control handles that aren't connected. When you move one, it has no affect on the other handle that's in the same point. So the line segments can come to a corner, at the point. Straight line segments have Corner Points, and handles that have been retracted into the point itself. Return to Corner Point in text.