Your donations make more tutorials possible. Thanks!
This tutorial is the result of a discussion I had at a Convention, where I was discussing with someone how to use Clipping Layers to make shading cels completely painless.
Watch the movie to see how I do it. (You can download the .flv file, or download the .mov if you have a hard time watching on line. You can also grab a transcript, if you'd like one.) The image I'm using is one I did in Pen and Ink on Canson Vidalon vellum, back in 1986.
You can clip a whole stack of layers to the Clipping Layer, and the visibility of all of them will be limited to the active pixels in the Clipping Layer itself.
Now you can freely add anything you want to the clipped layers, and it will all be controlled by the layer transparency in the Clipping Layer. Anything "outside the lines" will never show! So it's the perfect way to shade cels.
Just isolate the line work on a transparent background, (I have a tutorial explaining how to isolate line work, if you're not sure how to do that.)
Select the Line Work layer, to make it active. Get the Magic Wand tool, making sure Contiguous is enabled. Then select all the pixels in one section by clicking in it. Shift-click if more than one section is to be shaded as a continuous area.
Enlarge the selection (Select > Modify > Enlarge...) to avoid any gaps between line and color, make a new layer below the line work, and Fill the selection.
That gives you flat color, beautifully rendered inside the lines, in 3 seconds flat.
If you want to shade inside the section, Create a new layer right above the Flat Color layer (and somewhere below the Line Work) using the Create New Layer icon at the bottom of the Layer Panel.
Clip it to the Flat Color layer by holding down the Option key on a Mac, or the alt key on the PC, and putting your cursor right on the line that separates the two layers in the Layer Panel. It will change to two interlocking circles when you are in the right spot. Click, and the layer on top will move to the right, with a bent arrow pointing down to show that it's clipped to the layer below.
Now go ahead and draw your shading, or whatever else you'd like to do, on that layer, secure in the knowledge that you don't have to worry about going outside the lines.
If you want more shading layers, just add them! You can have as many as you like. If you add them between clipped layers and the Clipping Layer, they'll be clipped automatically. If you add them on the top, you'll need to clip them manually.
Repeat for each section, and you'll have a wonderful image in far less time than it would take to do without Clipping Layers.
If you'd like more information about any of the steps, you can find it in the Accordion below.

There are a few options connected with using the magic wand tool. In the movie, I assume that you know how to use it; but I realize that's not necessarily true. So, if you're selecting more than you want to, this is what you need to know.
If you don't have Photoshop CS4, your interface might not look exactly like this. But these things are all in your Options somewhere. Check your manual or online help to find out where the Options are, if you need to.
On the far left are buttons that let you choose what will happen when you use the magic wand while you already have an active selection.
Next is a text field that lets you set the Tolerance.
On the right are three check boxes that let you enable or disable Anti-aliasing, Contiguous Selections, or Sample all layers.. A check will Enable the property. Click in the box to toggle the checkmark, of course.
All these things are explained in detail below, if you'd like more information about what any of them do.
Finally, in CS4, there's a "Refine Edge" button, which is wonderful. However, it's not in earlier versions, and it's not really needed for this, so I'm not going to explain all the options there. Feel free to explore it if you have it, though!
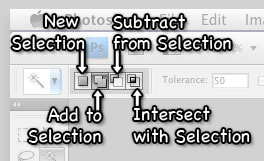 The group of four icons on the left deals with how selections are added to each other. The four icons mean "New Selection", "Add to Selection", "Subtract from Selection" and "Intersect with Selection", in that order. You can click the icons to change what will happen when you have an active selection (something with Marching Ants around it) and you click again.
But I recommend that you learn the keyboard shortcuts instead. Hold down the Shift key to Add to the Selection, the Option key (alt on a PC) to Subtract from the Selection, and both at once to Intersect with the Selection.
They all do pretty much what they say they will.
New Selection will drop the old one, and make a new one. Add will increase the selection by the newly selected area. Subtract will decrease it by removing the new selection. Intersect will select only those pixels which are in both the old and the new.
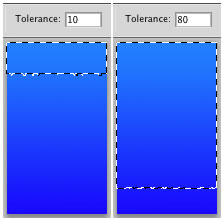 The next option is Tolerance. This determines how closely other pixels will have to match the one actually clicked on, in order to be included in the Selection.
A low number means they have to match very closely. A high number allows them to vary quite a bit, and still be selected. You can type any value you want into the text field.
For cel shading, I leave it pretty high, since I want to catch a bit of the edge of the line work, and I know that all the interior of any given section is all exactly the same, since it's transparent.
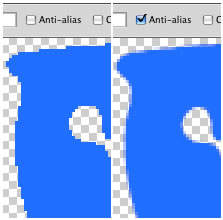 With the first checkbox, you can determine if the edges of the selection will be anti-aliased or not. If they are, they will appear smooth; but you will have pixels that are partially selected. (That's how anti-aliasing works.) If you deselect this, then you'll get sharp edges where you have vertical or horizontal lines, and jaggies everywhere else.
The picture shows the results of filling a selection, first a selection made with Anti-alias disabled, and then a selection made with Anti-alias enabled.
For cel shading, I tend to leave anti-aliasing off, since the edges will be hidden under the line work. It just makes things a bit sharper, and prevents color leaking in tight places.
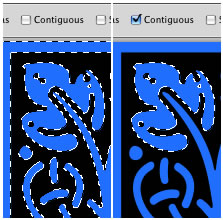 The next option is Contiguous. If it's enabled, then clicking will select all the pixels of the given shade that touch other pixels of that shade, back to the one you clicked on. Pixels that are beyond the Tolerance act like walls, so you can select regions of color. If it's disabled, then the selection will jump the walls, and you'll get all the areas of that color anywhere in your image.
If you are getting all the regions when you click, you need to click in the Contiguous checkbox, to Enable it.
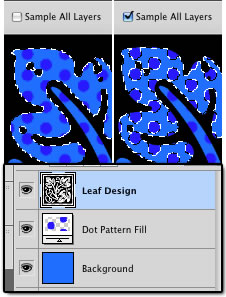 Finally, you have Sample All Layers. If you have this enabled, then the image acts as if it's flat, for selection purposes. If it's not, then the Magic Wand will only select pixels on the layer that is selected at the time.
This one is a personal taste thing, for cel shading.
If you leave it disabled, then you won't have to return to the top, and select the Line Work layer, before you can select the next cel. This can be a huge time saver, in a complex image. By the same token, I find that I make more mistakes when it's enabled, so I tend to leave it off. But that's me. You might very well have better aim than I do!
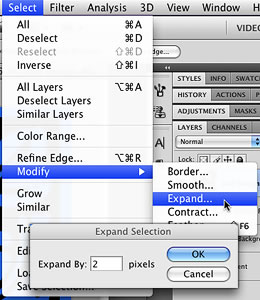 As part of this method, you need to Expand the Selection. You do that by going to Select > Modify > Expand...
That opens a dialog that lets you determine how many pixels you want the selection to grow, on all sides. Choose a number that will take the selection to about the middle of the lines in your line work. (How far that is depends on the scale of your image, and the thickness of your lines, of course.)
The purpose of this is to ensure that there are no gaps between the edge of the lines and the color. This is especially important in corners and sharp edges; but it can also remove spots in the interior of a cel, if your artwork isn't perfectly clean.
You may still need to go back and fill in some small gaps, or very tight corners; but it's much, much faster (and more accurate) to do it this way than to manually color in the whole cel.
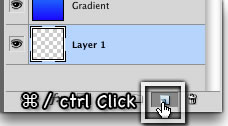 Ordinarily, when you click the Create New Layer icon at the bottom of the Layer Panel, you'll get a new layer above the one you have currently selected, named "Layer n" (where n is the next unused layer number.)
If you would like to make a new layer below the one that's currently selected, instead, all you have to do is hold down the Command key on a Mac, or the ctrl key on a PC, when you click the icon.
The new layer will automatically be created below the currently selected one, and you won't have to drag it down there. A small thing, but small things add up when deadlines are approaching!
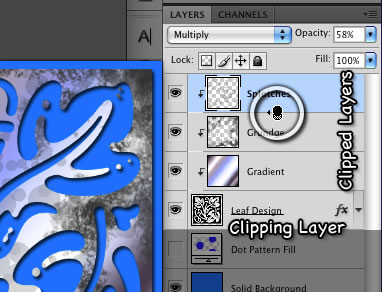 Clipping layers are wonderful things. They restrict the visibility of pixels on the clipped layers (the ones on the top) to the active pixels on the Clipping Layer (the one on the bottom.)
In other words, they use the transparency of the Clipping Layer as if it were a mask for all the layers that are clipped to it.
This is far more efficient than a mask for lots of things.
For example, you can draw a shape, extract a photograph, or fill an area (as we do here) and then use it as a clipping layer to shade it without worrying about going out of the lines. If you change the shape, the shading automatically shows, without having to copy a bunch of layer masks.
You can use type as a Clipping Layer, clip a gradient, an image, or anything you want to it, and when you change the type, the gradient will just be there, with no further work needed.
Use your imagination, and I'm sure that you'll see how very, very useful these can be!
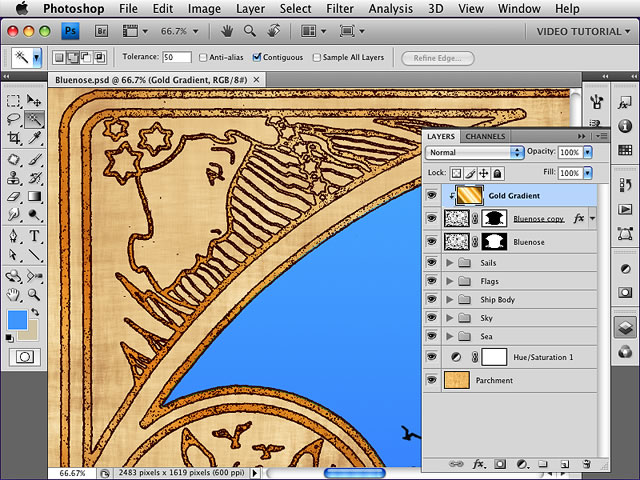
In the movie, I mentioned that I find it better to isolate the line work on a transparent ground, instead of leaving it as a black and white image and using the Multiply blending mode, because it gives you more flexibility, since you can manipulate the outlines.
This is what I mean.
Notice that, in the final image from the movie, I've clipped a Gold Gradient to the line work, to give an effect of a burnished gold overlay on parchment. I've also applied a layer style, to heighten that effect. In this case, it's a stroke, in a dark red-brown, that falls into the purposely grainy lines, to give it an aged and tarnished look.
This is the kind of thing that simply cannot be done on a black and white image.
All of that is on a copy of the lines, so that I can still have the black lines where the image is colored. I've used masks, one the Inverse of the other, to separate the two kinds of line work.
You might also notice that all the cels have been grouped into Sets, which just makes a large image like this one, with many, many layers, much easier to deal with.
Anyway, I thought that you might find it interesting, and I couldn't put this shot into the movie, and still show you the finished cel shading, so I'm putting it here instead!
Note: if you would like to see the information in the Accordion when printing the page, disable Javascript in your Browser, and reload the page. You should see all the Accordion panels open before you print.