Your donations make more tutorials possible. Thanks!
Sometimes, you want to have a pattern on cloth that was plain when it was painted or photographed. Fortunately, it's not at all difficult to do that in Photoshop, (although it can be a bit time consuming.)
To see one method, watch the movie. (If you have trouble watching it on line, you can download the movie in .flv format, download the movie as an .mov file, or grab a transcript in .rtf format.)
In order to do this, we need to have the cloth responding to the light and dark that makes the folds.
So, first, make a copy of the layer with the folds on it, so that you can sandwich the pattern between the two. This can make it easier to see what you're doing.
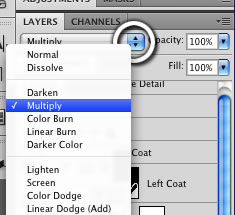
Then set the topmost of those two layers to a blend mode of Multiply, in the Blend Mode menu at the top of the Layer Palette.
Then use the Lasso tool, the Pen tool, or whatever selection method you are most comfortable with to select a single fold of the fabric.
Open the pattern you want to use, and copy it to the clipboard. (Remember, if you're using a Pattern Layer from the Fill and Adjustment layers, you will need to Copy Merged, or you won't get anything.)
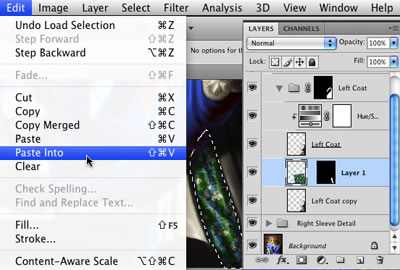
Then change back to your image, where your selection is still active, and Paste Into. (Shift Command V on a Mac, or Shift ctrl V on a PC.) That will make a new layer, paste the clipboard contents into it, and create a mask that will only show the area inside the selection, all in a single step.
Use Free Transform (Command T on a Mac, or ctrl T on a PC) to adjust the pattern to your liking, and repeat for all the other folds!
If you have the time and inclination, and a version of Photoshop that includes the Liquify filter, you can add more realism by pushing the pattern together at the edges of the folds.
Just use the Forward Warp tool, and go around all the edges, adding some perspective by foreshorting the pattern that's at an angle to your viewpoint.
And that's it!
There's more detailed information in the Accordion below, if you'd like to see it.
 You can find the Blending Modes at the top of the Layers Panel. (Layers Palette in pre-CS4 versions of Photoshop; but except for the name, it's exactly the same.)
The Blending Modes determine how the layer interacts with the layers below it.
"Multiply" multiplies the colors of the pixels on the layer with that of the layers below. The result is always a darker color, unless a pixel in the top layer is pure white, in which case it has no effect on that pixel in the layers below it.
In this case, we're using Multiply so that the shading from the folds is automatically applied to the pattern.
You might find that a different blend mode works better for you, in your particular image. To cycle through Blend Modes quickly, hold down the Shift key, and then tap the + and - keys on your keyboard. This works for both platforms, and with either the keyboard or your numeric key pad.
 You can make a pattern from any section of any image.
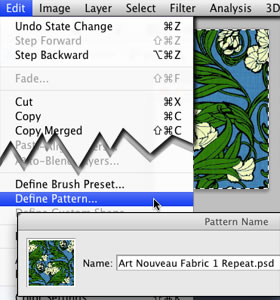
All you have to do is decide what you want to use, draw a marquee around it with the Marquee tool, and then go to Edit > Define Pattern.
That will open a dialog that lets you name your pattern. By default, it'll have the name of the document that it's taken from, but feel free to rename it.
Your new pattern will appear in the Pattern menu, wherever you can use patterns in Photoshop.
(If you want to use it more than this one time, make sure that you Save your patterns, or close Photoshop and reopen it. If the program crashes before you have done either of these things, your pattern will be lost.)
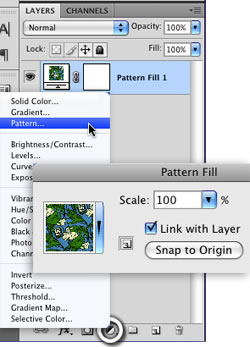
 Pattern Layers are found under the "Fill and Adjustment Layers" menu, at the bottom of the Layers Panel (Layers Palette in older versions.)
There are several advantages to using them, instead of using the paintbucket, or the Edit > Fill command (F5 on the keyboard.)
First, you can change the pattern on the fly, if you decide that you would rather use a different one. But the really important difference is that you can adjust the scale or position of the fill.
To change the scale, simply move the slider in the Pattern Fill dialog. You can also change the pattern here, by selecting a different one from the menu behind the pattern swatch.
To change the position of the pattern, just drag it with the Move tool. You can do this whenever the Pattern Fill dialog is open. Or, if you check to enable "Link with Layer" you can drag it around at any time.
There are several disadvantages, too, of course. The most important one is that the pattern cannot be rotated or Transformed in any way, (except Scale, as noted above.) It's also not exactly pixels on a layer; so if you are copying it, as we do here, you need to use Copy Merged (Shift Command C on a Mac, or Shift ctrl C on a PC) instead of the normal Copy.
To get the best of both worlds, begin your patterns using the Pattern Layer, and then, if you need to rotate, skew, etc. copy the Layer (Command J on a Mac, ctrl J on a PC) and Rasterize it.
To do that Right Click an empty place on the Layer in the Layers Panel, and choose Rasterize Layer from the contextual menu, or go to Layer > Rasterize > Fill Content.
Making the copy first leaves you with the pattern layer, in case you want to change it later.
 Paste Into is one of the commands in Photoshop that just saves time.
Many of the things we do in Photoshop can be done in several different ways; for instance, you could get this same effect by pasting, and then making a mask for the layer.
But choosing to do it this way, which makes the mask as you paste, can streamline your workflow. This is especially true when you are doing the same thing a number of times, as we are here.
Note: if you would like to see the information in the Accordion when printing the page, disable Javascript in your Browser, and reload the page. You should see all the Accordion panels open before you print.