Your donations make more tutorials possible. Thanks!
It's very easy to paint right on a model in CS4, using all the tools, layers, adjustment layers, and so on that we are familiar with. (And there was much rejoicing!)
To find out how to do that, just watch the movie! (You can download the movie, if you have trouble watching on line. You can also download an .rtf file with the transcript, if you'd like one.) If you need to see one of the previous movies first, they're in the menu bar on the left, in the PS CS4 Extended section.
Each mesh has one or more materials associated with it. Those are set up in your 3D program, and cannot be added, deleted, or changed in Photoshop.
Each material can have one or more textures assigned to it. The textures, which you can add or delete here, determine how each material actually looks in the image. The textures are the things we paint on, here in PS CS4. There are nine different texture modes (Diffuse, Bump, etc.) and we can paint on seven of them. You manage those in the Material pane of the 3D Panel.
All the textures will be listed by mode when you open the 3D Layer Flippy.
To see a thumbnail of the texture, mouse over it.
To open a texture, so you can work with its layers and things, double click on it. That will open the .psb file, which works like any layered PS Document.
To Paint on directly on the model, choose which Texture Mode you want to paint on, choose your tools, and start to paint! (If you don't choose a mode, you'll paint on the Diffuse by default, which is probably what you want to do.)
Your brush strokes appear on the selected layer of the Texture that's assigned to the mode and Material your brush is on top of. To paint across different materials, just do it. Photoshop will take care of all the internal stuff.
To Paste an image onto a model, just Paste, as you normally would. The image will be on its own layer, of course. Then manipulate the model into place, or resize and position the image, so it's exactly where you want it. When it is, just Merge Down (Command E on a Mac, ctrl E on a PC) and the image will fall down onto the model.
To paint using a different mode (for instance, to paint in a Bump,) go to 3D > 3D Paint Mode and choose the mode you wish to paint on. (There's more information about that below.)
You will not be able to paint on parts of the model that you cannot see, or parts not facing the camera. (Which is really a Good Thing, because it would be too distorted to be useful.) You can control that to some extent with the Paint Falloff Angle. That is advanced, though, and will be covered in another tutorial.
If you need to cover a large area, you can either turn the model, or open the texture directly (double click), and fill the area on the 2D texture. Nothing at all says you can't paint on both the flat texture and the model.
To hide parts of the model, so that you can see the area you want to paint on, open the 3D Panel, go to the Scene pane, and enable Cross Section. (There is more information about that below, if you find the parameters confusing.)
To Save out the texture, so you can use it someplace else, just double click on it to open the .psb file (see above) and then Save As... the way you normally would. That will give you a normal .psd file, no longer associated with the model, that you can use however you'd like.
For more detailed information, see the Accordion below.
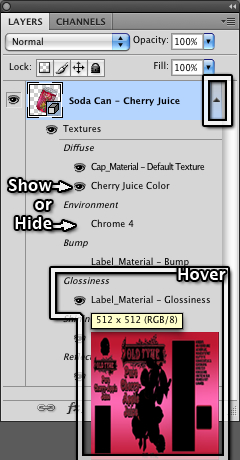 To show or hide the Textures in the Layers Panel, click the flippy on the right side of the 3D Layer.
The textures will all be listed by Mode. (Diffuse, Bump, Glossiness, etc.)
To hide a texture, click the eyeball next to its name. It will no longer be shown on the model, and what you'll see there is whatever value you have in the text field or swatch. (See the Materials Pane, below.)
To show a hidden texture, click the eyeball icon again.
If you hover over a texture name, you'll get a Tool Tip and a Thumbnail, so you can see the size and bit depth of the image, as well as what it looks like, without having to actually open it.
To open a texture so you can edit it directly, (change the layer you are working on, resize, paint on it, and so on,) simply double click its name here in the Layers Panel. That will open the .psb file, which acts exactly like any layered Photoshop file.
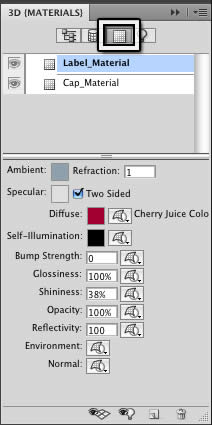 This is the Materials pane of the 3D Panel. All the Materials being use in this 3D Layer will be listed here, at the top. This is the default Soda Can, so it has two materials; Label_Material, and Cap_Material. Materials cannot be added or deleted in Photoshop.
As you can see, there are a number of different attributes in the bottom of the pane. Any of the ones that have a button to the right of them can take an image as a Texture. (The button is the icon that looks like a sheet divided into squares, half lying on a sphere. That's a material being applied to a mesh, of course.)
When an image has been assigned, as it has in this case to the Diffuse mode, the name of the image will appear to the right of the button. In this case, the name is "Cherry Juice Color" since that's the image I put on the can.
Texture images always completely override the values in the text boxes or swatches. The cherry color from the swatch doesn't show through the can label at all, for instance. The single exception to this rule is the Bump Strength. More about that below.
Diffuse is the color that's applied to the model.
Self-Illumination is glow, and is not affected by light sources (or the lack of them.) In other programs, it's often called "Luminosity."
Bump Strength is a bump map, with black being the lowest elevation, and white being the highest. Successful bump maps are a little blurry, which gives a much smoother transition, not as prone to artifacts. Unlike the other textures, the Bump texture modifies the Bump Strength, it doesn't replace it. So the number in the text field here determines how high and low the highest and lowest elevations appear to be. If this is set to zero, for example, no amount of painting on the bump map will show. The range is whole numbers from 0 to 10, with 10 being the bumpiest.
Glossiness is highlight strength. In other programs, it's often referred to as "Specularity". Black is 0% or no highlights at all, and White is 100% or as bright as it can get. Colors will affect the color of the highlight; so if you want a surface to look metallic, paint on the Glossiness map in the colors you want for the highlight.
Shininess controls the spread of the highlights. In other applications, it's called "Roughness" or "Smoothness." It has no effect if Glossiness is set to 0%. However, if there is some glossiness, this setting determines if the highlights are spread out, or if they are sharp. The higher the value, the sharper the highlight, and the darker the object. Color is a little unpredictable on this layer, and doesn't add any color. So I recommend that you stick to black and white while painting on it. Black is matte, and gives you a very spread out highlight (lots of light.) White is shiny, and gives you very sharp highlights (dark object.)
Opacity controls transparency. Black is fully transparent, white is totally opaque. However, opacity doesn't affect the other attributes (except Diffuse.) So you can make things like shiny, bumpy glass very easily. But if you want to make a portion of the model disappear, you need to make sure that part has no shine, bump, etc. as well as having black in the Opacity texture.
Reflectivity, of course, controls how reflective something is. Black is no reflectivity at all, white is completely reflective, like chrome. Color applied to the Reflectivity texture not only determines the amount of reflectivity, but also the color shift. Lighter colors will appear more reflective than darker ones, of course.
Finally, there are two maps you can load, but you cannot paint on; Environment and Normal. Environment gives the Reflectivity something to reflect. If you want blurry reflections, you need to blur them on the image. (Double click to open and change it.) Normals are just that. If you have a Normal Map, you can apply it here.
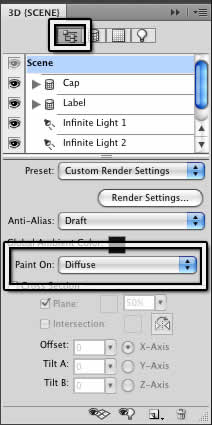 There are two ways to choose which texture mode image you would like to paint on.
You can open the 3D Panel (Window > 3D if it's not in your Layout) and click the Scene tab, at the left top, to open the Scene pane. In about the middle of the lower section, you'll find a line that says, "Paint On:" with a drop down menu next to it. Choose the mode you want to paint on from that menu.
You can also simply go to 3D > 3D Paint Mode and choose the mode you want from the fly out menu.
In either case, any brush stokes that you make will be on the texture that is associated with that mode.
If you attempt to paint using a mode that doesn't have a texture associated with it, Photoshop will give you a warning dialog telling you that one or more materials in the layer are missing that mode, and saying that it will create one.
If you click OK, you'll be given the normal "New" dialog, so you can name your texture and set its attributes. Once you click OK on that one, the texture will be made, and associated with that mode, just as if you'd made it by clicking the New Texture button in the Material pane.
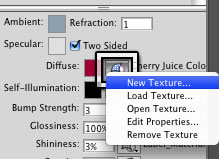 To create a Texture for a mode that doesn't have one, click the Material button next to that Texture Mode in the Material Pane of the 3D Panel.
You'll get a fly out menu with a number of choices.
The first one is New Texture. Click that, and you'll get a normal "New" dialog box, (like you do whenever you click the "New" button in Photoshop,) that allows you to choose the Name, Size, Resolution, Color Mode (RGB, Grayscale, etc.) and the Background Contents (solid color or Transparent) You can also choose a color profile and pixel aspect ratio here.
When you click "OK", the new texture will be applied to the model, and will appear in the List. If you named it, that will be the name you will see, of course. If you didn't, then Photoshop will name it for the Material and mode. ("Default - Bump," for example, for a bump map on a material that was called "Default".)
Note: If you want to paint on the texture you just made, you'll need to change the mode you are painting with. Photoshop does not change the Paint On mode automatically.
To Open a texture, if you don't want to double click on it, you can choose Open from this menu, as well.
To Remove a Texture, choose Remove from the bottom of this menu. The texture will be gone.
You can recover it if you Undo, or through the History panel; but you won't be able to get to it any other way. It's not just disassociated, it's really gone. So if you think there is any chance that you might want to use it again in the future, I highly recommend that you Save a copy somewhere on your hard drive before you Remove. That way you can Load it later if you need to. (See Load a Texture, below.)
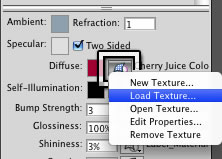 To load an existing texture to use as the texture on a 3D model (for instance, a texture that you have made for this model, or a similar model, somewhere else) click on the Texture button in the Material pane of the 3D Panel.
That will open a fly out menu.
Choose Load Texture... from the menu, browse to the texture you want to use, and choose it.
The new texture will replace the one that is currently in use on the model (if any.) The name of the texture will also replace the previous name (if any) in the texture list of the 3D Layer in the Layers Panel.
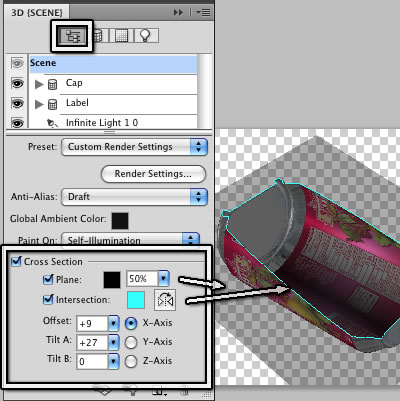 If there are parts of the model that you can't easily see to paint, it's very simple to hide anything that's in the way.
One of the ways to do this is to go to the Scene pane of the 3D Panel, and enable Cross Section at the bottom.
By default, when you do so, half the model will be "cut away", and the plane of the cut will be shown with a black square at 50% opacity.
You can change the color or opacity of the Plane, or hide it completely, with the Plane fields, in the dialog. Simply click the checkbox next to the word "Plane" to disable (or enable) it. Click the color swatch to recolor it. Type a new opacity into the text field (it's at 50% in this example,) or scrub the numbers, as you would normally do in Photoshop.
If you would prefer to see a 1 pixel line that shows where the Plane intersects the model, you can enable "Intersection" by using the checkbox there, just below the Plane. You can recolor the line by using the color swatch.
Next to that is a flip button. It looks like two triangles, pointing at each other over a dotted line, with an arrow arcing between them. Click that to hide the portion of the model that is currently showing, and show the part that's hidden. Click again, to toggle back the other way.
At the bottom left, there are text fields that allow you to set the Offset, Tilt A, and Tilt B. You can type or scrub, as usual, to fine tune the portion of the model that's hidden.
On the bottom right, you can choose which Axis is perpendicular to the plane of the cut. These are the model axes, not the view axes, by the way. And Photoshop seems to think that the Z axis is the vertical, contrary to normal usage in the majority of 3D programs. Just so you're aware of it.